Loading... ## MySQL5与MySQL8的配置差异 ```xml #mysql5 mysql.driver=com.mysql.jdbc.Driver mysql.url=jdbc:mysql://localhost:3306/test?allowMultiQueries=true mysql.username=root mysql.password=root ``` ```xml #mysql8 dataSource.driver=com.mysql.cj.jdbc.Driver dataSource.url=jdbc:mysql://localhost:3306/test?Timezone=GMT%2B8&useSSL=false&characterEncoding=utf8 dataSource.username=root dataSource.password=root ``` --- ## Mybatis架构和流程源码分析 ### 整体架构 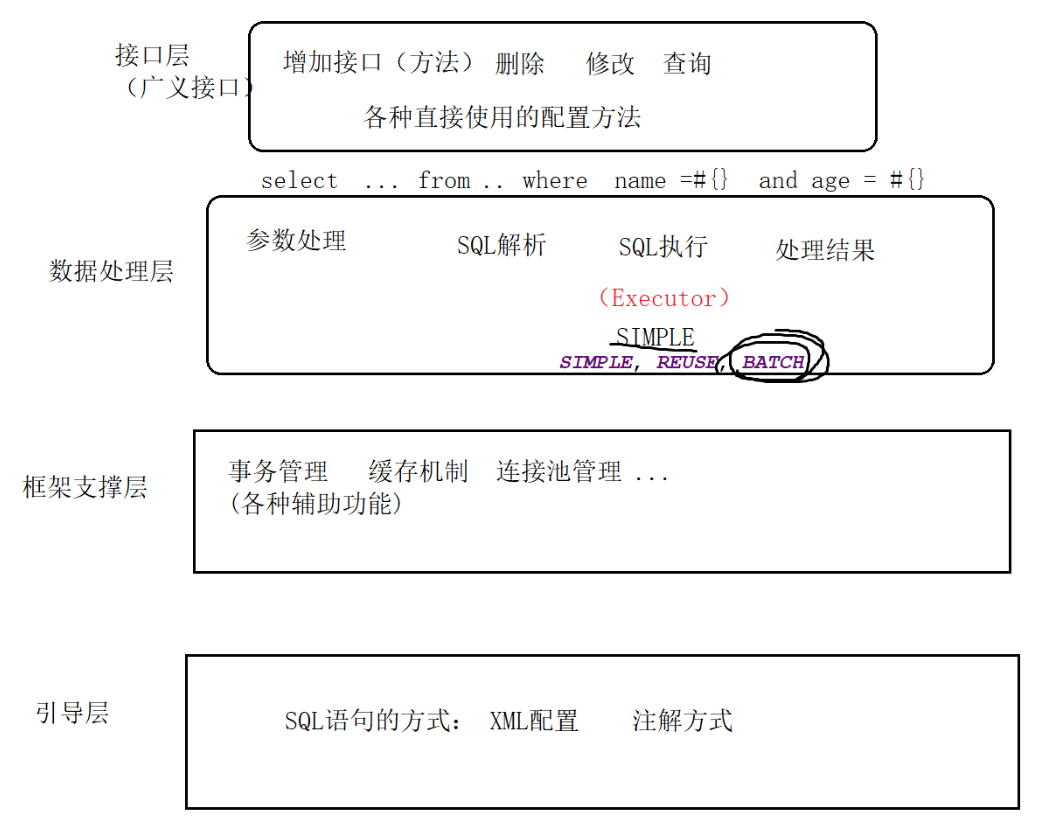 ```Java //根据学号查询一个学生 public static void testQueryByNo() throws IOException { String resource = "conf.xml"; Reader reader = Resources.getResourceAsReader(resource); SqlSessionFactory sessionFactory = new SqlSessionFactoryBuilder().build(reader); SqlSession session = sessionFactory.openSession(); //传入StudentMapper接口,返回该接口的mapper代理对象studentMapper StudentMapper studentMapper = session.getMapper(StudentMapper.class);//接口 //通过mapper代理对象studentMapper,来调用IStudentMapper接口中的方法 Student student = studentMapper.queryStudentByNo(11); System.out.println(student+"****"); session.close(); } ``` ### (1)获取SqlSessionFactory对象 SqlSessionFactory里面最主要的就是parser解析器,通过parseConfiguration()在configuration标签设置了properties、settings、environments等属性标签,并将所有的配置信息放在了Configuration对象中 它还解析了所有的XxxMapper.xml文件,并分析其中的增删改查标签,`<select id="" resultType=""> ` 等属性是通过 parseStatementNode()解析的。且会将XxxMapper.xml中的<select>等标签解析成 MappedStatement对象。即**MappedStatement对就是<select>等标签** **总结**:阅读SqlSessionFactory对象可知,所有的配置信息、增删改标签全部存在于Configuration中,Configuration又存在于DefaultSqlSessionFactory对象中(SqlSessionFactory) **流程**:`SqlSessionFactory对象 -> DefaultSqlSessionFactory -> Configuration -> 包含了一切配置信息` ### (2)获取SqlSession对象 从源码 `configuration.newExecutor(tx, execType)->SimpleExecutor`可知,该方法会根据不同的类型execType,产生不同的Executor,并且会对执行器进行拦截操作:`executor = (Executor) interceptorChain.pluginAll(executor);`并且通过装饰模式,将刚才产生的executor包装成一个更加强大的 executor。 **作用**:以后如果我们要给MyBatis写自己的插件,就可以通过拦截器实现。(插件步骤过程:1写插件、2放入拦截器) **流程**:`SqlSession -> openSession() -> openSessionFromDataSource() -> DefaultSqlSession(configuration,executor,事务)对象 -> 执行SQL` ### (3)获取XxxMapper对象(代理接口中的方法、mapper.xml中的<select>等标签) + (4)执行<select>等标签中定义的 XxxMapper.queryAll()只是个代理对象的方法,真正执行改queryAll()方法的不是它,而是MapperProxy的invoke(),即用到了JDK动态代理接口InvocationHandler,来代理执行。 从 `mapperMethod.execute(sqlSession,args)`可知,实际调用增删改查的方法是依靠了sqlSession中的configuration和executor。 从 `method.convertArgsToSqlCommandParam(args)`可知,处理增删改查方法的参数如果是0则return null;如果是1则返回第一个。 从查询方法 `selectOne() -> selectList():configuration.getMappedStatement()`可知,要先获取到用于增删改查的对象。 `boundSql`是将我们写的**SQL**和**参数值**进行了拼接后的对象,即最终能被真正执行的SQL。而执行SQL是通过Executor(如果缓存中没有要查询的内容,则进入数据库真实查询:queryFromDatabase()) mybatis使用的jdbc对象是PreparedStatement,底层执行增删改查:PreparedStatement的execute()。 ### Mybatis四大处理器(StatementHandler、ParameterHandler、TypeHandler、ResultSetHandler) 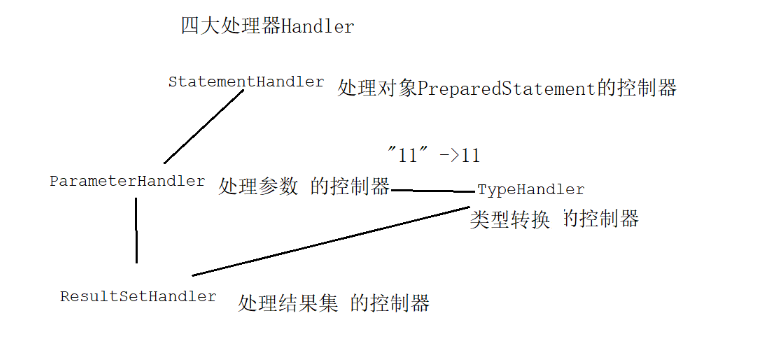 ### Mybatis四大核心对象StatementHandler、ParameterHandler、ResultSetHandler、Executor) 特点: 1.都涉及到了**拦截器**用于增强 2.四大核心对象都包含了该增强操作 --- ## 设置单个/多个别名 在conf.xml底下的<configuration>增加 ```xml <typeAliases> <!-- 单个别名 (别名 忽略大小写) --> <!-- <typeAlias type="org.lanqiao.entity.Student" alias="student"/> --> <!-- 批量定义别名 (别名 忽略大小写),以下会自动将该包中的所有类 批量定义别名: 别名就是类名(不带包名,忽略大小写) --> <package name="org.lanqiao.entity"/> </typeAliases> ``` **SpringBoot方法:** ```xml mybatis: # mapper-locations: classpath:mapper/*.xml type-aliases-package: com.example.demo.entity ``` --- ## resultMap resultMap可以实现2个功能: 1. 类型转换(要实现接口 比较麻烦,个人思路:Mybatis-plus使用注解 @TableField(exist = false) 注明非数据库字段属性) 2. 属性-字段的映射关系 a.创建转换器:需要实现TypeHandler接口(继承BaseTypeHandler) ```Java package org.lanqiao.converter; import java.sql.CallableStatement; import java.sql.PreparedStatement; import java.sql.ResultSet; import java.sql.SQLException; import org.apache.ibatis.type.BaseTypeHandler; import org.apache.ibatis.type.JdbcType; //BaseTypeHandler<java类型> public class BooleanAndIntConverter extends BaseTypeHandler<Boolean>{ //java(boolean)-DB(number) /* * ps:PreparedStatement对象 * i:PreparedStatement对象操作参数的位置 * parameter:java值 * jdbcType:jdbc操作的数据库类型 */ @Override public void setNonNullParameter(PreparedStatement ps, int i, Boolean parameter, JdbcType jdbcType) throws SQLException { if(parameter) { ps.setInt(i, 1); }else { ps.setInt(i, 0); } } //db(number)->java(boolean) @Override public Boolean getNullableResult(ResultSet rs, String columnName) throws SQLException { return sexNum == 1?true:false ; } @Override public Boolean getNullableResult(ResultSet rs, int columnIndex) throws SQLException { int sexNum = rs.getInt(columnIndex) ;//rs.getInt(1) return sexNum == 1?true:false ; } @Override public Boolean getNullableResult(CallableStatement cs, int columnIndex) throws SQLException { int sexNum = cs.getInt(columnIndex) ;//rs.getInt(1) return sexNum == 1?true:false ; } } ``` b.配置conf.xml ```XML <typeHandlers> <typeHandler handler="org.lanqiao.converter.BooleanAndIntConverter" javaType="Boolean" jdbcType="INTEGER" /> </typeHandlers> ``` c.XxxMapper.xml中使用 ```XML <select id="queryStudentByStunoWithConverter" parameterType="int" resultMap="studentResult" > select * from student where stuno = #{stuno} </select> <resultMap type="student" id="studentResult"> <!-- 分为主键id 和非主键 result--> <id property="stuNo" column="stuno" /> <result property="stuName" column="stuname" /> <result property="stuAge" column="stuage" /> <result property="graName" column="graname" /> <result property="stuSex" column="stusex" javaType="boolean" jdbcType="INTEGER"/> </resultMap> ``` ### resultType+HashMap实现属性-字段的映射关系 colunm-entity ```SQL <select id="queryStudentByIdWithHashMap" parameterType="int" resultType="student" > select id "stuNo",name "stuName" from student where id = #{id} </select> ``` ## ResultMap(EasyCode中的写法) ```xml <select id="queryById" resultMap="UserMap"> select id, name, age from test.user where id = #{id} </select> <resultMap type="com.example.demo.entity.User" id="UserMap"> <!--没有另外区分主键,数据也能查找--> <result property="id" column="id" jdbcType="INTEGER"/> <result property="name" column="name" jdbcType="VARCHAR"/> <result property="age" column="age" jdbcType="INTEGER"/> </resultMap> ``` ## resultMap鉴别器 场景:学生表(sno,sname,ssex,shigh,sweigh),需要用鉴别器实现在entity字段中有一个character,如果是男生则显示身高如果是女生则显示体重。 ```xml <resultMap type="com.example.demo.entity.Student" id="StudentMap"> <result property="sno" column="sno" jdbcType="INTEGER"/> <result property="sname" column="sname" jdbcType="VARCHAR"/> <result property="ssex" column="ssex" jdbcType="BOOLEAN"/> <result property="shigh" column="shigh" jdbcType="INTEGER"/> <result property="sweigh" column="sweigh" jdbcType="INTEGER"/> <result property="scharacter" column="scharacter" jdbcType="INTEGER"/> <!--鉴别器,对查询结果进行分支处理:如果是男则特征为身高,如果是女则特征为体重--> <!--ssex在数据库中的类型是tinyint(1),可以直接默认为Boolean类型--> <discriminator javaType="Boolean" column="ssex"> <case value="true" resultType="com.example.demo.entity.Student"> <result column="shigh" property="scharacter"/> </case> <case value="false" resultType="com.example.demo.entity.Student"> <result column="sweigh" property="scharacter"/> </case> </discriminator> </resultMap> ``` --- ## 两种取值符号 **`#{属性名}`** :防止SQL注入(一般情况用这个) **`'${属性名}'`** :模糊查询常用 `select * from student where stuname like '%${stuName}%'` 简单类型下第二种方式为 `${value}`,value为固定名称 两者都支持属性级联: `select * from student where homeaddress = #{address.homeAddress}` --- ## 存储过程 **1.在数据库中运行存储过程sql** ```SQL create or replace procedure queryCountByGradeWithProcedure(gName in varchar, scount out number ) as begin select count(*) into scount from student where graname = gname ; end; / ``` **2.在mapper.xml调用存储过程** 通过statementType="CALLABLE"设置SQL的执行方式是存储过程。 ```Java <!-- 通过调用[存储过程] 实现查询 ,statementType="CALLABLE" 存储过程的输入参数,在mybatis用Map来传递(HashMap) --> <select id="queryCountByGradeWithProcedure" statementType="CALLABLE" parameterType="HashMap" > { CALL queryCountByGradeWithProcedure( #{gName,jdbcType=VARCHAR,mode=IN}, #{scount,jdbcType=INTEGER,mode=OUT} ) } </select> ``` **3.在mapper接口写入** 存储过程的输入参数gName需要通过HashMap来指定 在使用时,通过hashmap的put方法传入输入参数的值;通过hashmap的Get方法 获取输出参数的值。 ```Java Map<String,Object> params = new HashMap<>();//通过map给 存储过程指定输入参数 params.put("gName", "g1") ;//指定存储过程的输入参数gName的值是g1 studentMapper.queryCountByGradeWithProcedure(params);//调用存储过程,并传入输入参数 Object count = params.get("scount") ;//获取存储过程的输出参数 ``` --- ## 动态SQL ### <where>会自动处理符合条件的(如:非空)第一个<if>标签中的and,但不会处理之后<if>中的and ```SQL <select id="queryStuByNOrAWishSQLTag" parameterType="student" resultType="student" > select stuno,stuname,stuage from student <where> <!-- <if test="student有stuname属性 且不为null"> --> <if test="stuName !=null and stuName!='' "> and stuname = #{stuName} </if> <if test="stuAge !=null and stuAge!=0 "> and stuage = #{stuAge} </if> </where> </select> ``` ### trim 功能比 `where`更强大,他不仅可以智能去掉开头第一个多余的判断(不仅仅是 `and`),还可以去掉结尾多余的判断。 其中 `prefix`是拼接头、`prefixOverrides`是删除头判断、`suffixOverrides`是删除尾判断 ```xml <select id="queryAll3" resultMap="StudentMap"> select sno, sname, ssex, shigh, sweigh, scharacter from test.student <trim prefix="where" prefixOverrides="and"> <if test="sno != null"> and sno = #{sno} </if> <if test="sname != null and sname != ''"> and sname = #{sname} </if> <if test="ssex != null"> and ssex = #{ssex} </if> <if test="shigh != null"> and shigh = #{shigh} </if> <if test="sweigh != null"> and sweigh = #{sweigh} </if> <if test="scharacter != null"> and scharacter = #{scharacter} </if> </trim> </select> ``` ### <foreach>查询学号为1、2、53的学生信息 拼接过程: ```SQL select * from student open: select * from student and stuno in ( item+separator: select * from student and stuno in (1,2,53 close: select * from student and stuno in (1,2,53) ``` 1.对象属性 ```SQL <select id="queryStudentsWithNosInGrade" parameterType="grade" resultType="student"> select * from student <where> <if test="stuNos!=null and stuNos.size>0"> <foreach collection="stuNos" open=" and stuno in (" close=")" item="stuNo" separator=","> #{stuNo} </foreach> </if> </where> </select> ``` 2.简单类型的数组: 无论编写代码时,传递的是什么参数名(stuNos),在mapper.xml中 必须用array代替该数组 ```SQL <!-- 将多个元素值 放入数组中 int[] stuNos = {1,2,53} --> <select id="queryStudentsWithArray" parameterType="int[]" resultType="student"> select * from student <where> <if test="array!=null and array.length"> <foreach collection="array" open=" and stuno in (" close=")" item="stuNo" separator=","> #{stuNo} </foreach> </if> </where> </select> ``` 3.集合: 无论编写代码时,传递的是什么参数名(stuNos),在mapper.xml中 必须用list代替该数组 ```SQL <!-- 将多个元素值 放入数组中 List<Integer> stuNos 值 {1,2,53} --> <select id="queryStudentsWithList" parameterType="list" resultType="student"> select * from student <where> <if test="list!=null and list.size>0"> <foreach collection="list" open=" and stuno in (" close=")" item="stuNo" separator=","> #{stuNo} </foreach> </if> </where> </select> ``` 4.**SQL片段+对象数组** ```SQL <!-- sql片段--> <sql id="objectArrayStunos"> <where> <if test="array!=null and array.length>0"> <foreach collection="array" open=" and stuno in (" close=")" item="student" separator=","> #{student.stuNo} </foreach> </if> </where> </sql> <!-- 将多个元素值 放入对象数组中Student[] students = {student0,student1,student2} 每个studentx包含一个学号属性 --> <select id="queryStudentsWithObjectArray" parameterType="Object[]" resultType="student"> select * from student <!--如果sql片段和 引用处不在同一个文件中,则需要 在refid 引用时 加上namespace: namespace.id--> <!--<include refid="org.lanqiao.mapper.abcMapper.objectArrayStunos"></include> --> <include refid="objectArrayStunos"></include> </select> ``` --- ## 表关联查询 ### 一对一 【场景】:根据学号(int)查询指定学生的所有Student信息和StudentCard信息(两个表) 【做法一】:新建一个 `StudentBusiness`的学生**业务扩展实体类**,继承一个属性多的,重写一个属性少的。 ```Java public class StudentBusiness extends Student{ private int cardId; private String cardInfo ; //StudentCard属性... } ``` ```SQL <select id="queryStudentByNoWithOO" parameterType="int" resultType="StudentBusiness" > select s.*,c.* from student s inner join studentcard c on s.cardid=c.cardid where s.stuno = #{stuNo} </select> ``` 【做法二】:Student类中增加StudentCard类属性,通过resultMap连接 ```Java public class Student { //1学生信息 private int stuNo ; private String stuName ; //2学生证信息 private StudentCard card ; } ``` ```SQL <!-- 利用resultMap实现一对一 --> <select id="queryStudentByNoWithOO2" parameterType="int" resultMap="student_card_map" > select s.*,c.* from student s inner join studentcard c on s.cardid=c.cardid where s.stuno = #{stuNo} </select> <resultMap type="student" id="student_card_map"> <!-- 学生的信息 --> <id property="stuNo" column="stuNo"/> <result property="stuName" column="stuName" /> <result property="stuAge" column="stuAge" /> <!-- 一对一时,对象成员使用 association映射;javaType指定该属性的类型--> <association property="card" javaType="StudentCard" > <id property="cardId" column="cardId"/> <result property="cardInfo" column="cardInfo"/> </association> </resultMap> ``` ### 一对多 ```Java public class StudentClass { private int classId; private String className; //增加学生属性 (通过该字段 让Student类和StudentClass类建立起关联) private List<Student> students ; } ``` ```XML <!-- 一对多 查询g1班的班级信息,和g1班的所有学生信息 --> <select id="queryClassAndStudents" parameterType="int" resultMap="class_student_map"> select c.*,s.* from student s inner join studentclass c on c.classid = s.classid where c.classid = #{classId} </select> <!-- 类-表的对应关系 --> <resultMap type="studentClass" id="class_student_map"> <!-- 因为 type的主类是班级,因此先配置班级的信息--> <id property="classId" column="classId"/> <result property="className" column="className"/> <!-- 配置成员属性学生,一对多;属性类型:javaType,属性的元素类型ofType --> <collection property="students" ofType="student"> <id property="stuNo" column="stuNo"/> <result property="stuName" column="stuName"/> <result property="stuAge" column="stuAge"/> </collection> </resultMap> ``` --- ## Log4j日志 **a.conf.xml中开启** 如果不指定,Mybatis就会根据以下顺序 寻找日志 **`SLF4J` → `Apache Commons Logging` → `Log4j2` → `Log4j` → `JDK logging`** ```XML <settings> <!-- 开启日志,并指定使用的具体日志 --> <setting name="logImpl" value="LOG4J"/> </settings> ``` **b.编写配置日志输出文件log4j.properties** 日志级别(建议在开发时设置debug,在运行时设置为info或以上): **`DEBUG` < `INFO` < `WARN` < `ERROR`** ```Java log4j.rootLogger=DEBUG, stdout log4j.appender.stdout=org.apache.log4j.ConsoleAppender log4j.appender.stdout.layout=org.apache.log4j.PatternLayout log4j.appender.stdout.layout.ConversionPattern=%5p [%t] - %m%n ``` --- ## 一级缓存、二级缓存 ### 一级缓存(同一个SqlSession对象) MyBatis默认开启一级缓存,如果用同样的SqlSession对象查询相同的数据,则只会在第一次查询时向数据库发送SQL语句,并将查询的结果放入到SqlSession中(作为缓存在)。后续再次查询该同样的对象时,则直接从缓存中查询该对象即可(即省略了数据库的访问)。 `session.commit();`时会自动清除一级缓存。 ```Java Reader reader = Resources.getResourceAsReader("conf.xml") ; SqlSessionFactory sessionFacotry = new SqlSessionFactoryBuilder().build(reader,"development") ; SqlSession session = sessionFacotry.openSession() ; StudentMapper studentMapper = session.getMapper(StudentMapper.class) ; Student student = studentMapper.queryStudentByStuno(1) ; //session.commit(); Student student2 = studentMapper.queryStudentByStuno(2) ; System.out.println(student); System.out.println(student2); session.close(); ``` 从控制台的日志中可看出,SQL只执行了一次。若中间插入 `session.commint()`则执行两次SQL操作。 ### 二级缓存(MyBatis默认关闭二级缓存,需要手工打开) MyBatis的二级缓存是将对象放入硬盘文件中的序列化操作。 触发将对象写入二级缓存的时机:SqlSession对象的 `session.close()`方法。 **一、Mybatis自带的二级缓存** Mybatis自带二级缓存:【同一个namespace】生成的mapper对象(namespace的值就是接口的全类名 `包名.类名`, 通过接口可以产生代理对象(studentMapper对象)),即:只要产生的xxxMapper对象来自于同一个namespace,则这些对象共享二级缓存。 **a.在 `conf.xml`下,`<settings></settings>`中追加声明** ```XML <settings> <!-- 开启二级缓存 --> <setting name="cacheEnabled" value="true"/> </settings> ``` **b.在具体的mapper.xml中声明开启(如studentMapper.xml中)** ```XML <mapper namespace="org.lanqiao.mapper.StudentMapper"> <!-- 声明此namespace开启MyBatis自带的二级缓存--> <cache/> ... </mapper> ``` **c.准备缓存的对象,必须实现了序列化接口 (如果开启的缓存Namespace="org.lanqiao.mapper.StudentMapper"),可知序列化对象为Student,因此需要将Student序列化 (序列化Student类,以及Student的级联属性、和父类)** ```Java public class Student implements Serializable{ private StudentCard card;//StudentCard也需要序列化 } ``` **d.禁用二级缓存** select标签中 `useCache="false"` **e.清理二级缓存** (1)与清理一级缓存的方法相同,`session.commit()`(一般执行增删改时会清理掉缓存;设计的原因**是为了防止脏数据**) 在二级缓存中,`session.commit()`不能是**查询**自身的commit ```Java Reader reader = Resources.getResourceAsReader("conf.xml") ; SqlSessionFactory sessionFacotry = new SqlSessionFactoryBuilder().build(reader,"development") ; SqlSession session = sessionFacotry.openSession() ; StudentMapper studentMapper = session.getMapper(StudentMapper.class) ; Student student = studentMapper.queryStudentByStuno(1) ; // session.commit();//使用查询自身的commit session.close();//进行缓存的时刻 //增删改 SqlSession updateSession = sessionFacotry.openSession() ; StudentMapper updateMapper = updateSession.getMapper(StudentMapper.class) ; Student updateStuent = new Student(); updateStuent.setStuNo(2); updateStuent.setStuName("lxs"); updateStuent.setGraName("ggg"); updateMapper.updateStudentByStuno(updateStuent); ; updateSession.commit();//commit会清理一级和二级缓存 //第二次查询 SqlSession session2 = sessionFacotry.openSession() ; StudentMapper studentMapper2 = session2.getMapper(StudentMapper.class) ; Student student2 = studentMapper2.queryStudentByStuno(1) ; session2.close(); ``` (2)在select标签中 增加属性 flushCache="true",刷新缓存(第二次命中率还是显示0.5) **三方提供/自定义的二级缓存(ehcache、memcache)** 要想整合三方提供的二级缓存 (或者自定义二级缓存),必须实现 `org.apache.ibatis.cache.Cache`接口,该接口的默认实现类是 `PerpetualCache`。第三方已经实现,只需调用即可。 **a.增加依赖** ```XML <!-- https://mvnrepository.com/artifact/net.sf.ehcache/ehcache-core --> <dependency> <groupId>net.sf.ehcache</groupId> <artifactId>ehcache-core</artifactId> <version>2.6.11</version> </dependency> <!-- https://mvnrepository.com/artifact/org.mybatis.caches/mybatis-ehcache --> <dependency> <groupId>org.mybatis.caches</groupId> <artifactId>mybatis-ehcache</artifactId> <version>1.1.0</version> </dependency> <!-- https://mvnrepository.com/artifact/org.slf4j/slf4j-api --> <dependency> <groupId>org.slf4j</groupId> <artifactId>slf4j-api</artifactId> <version>1.7.25</version> </dependency> ``` **b.编写ehcache配置文件Ehcache.xml** ```XML <ehcache xmlns:xsi="http://www.w3.org/2001/XMLSchema-instance" xsi:noNamespaceSchemaLocation=""> <!--当二级缓存的对象 超过内存限制时(缓存对象的个数>maxElementsInMemory),存放入的硬盘文件 --> <diskStore path="D:\Ehcache"/> <!-- maxElementsInMemory:设置 在内存中缓存 对象的个数 maxElementsOnDisk:设置 在硬盘中缓存 对象的个数 eternal:设置缓存是否 永远不过期 overflowToDisk:当内存中缓存的对象个数 超过maxElementsInMemory的时候,是否转移到硬盘中 timeToIdleSeconds:当2次访问 超过该值的时候,将缓存对象失效 timeToLiveSeconds:一个缓存对象 最多存放的时间(生命周期) diskExpiryThreadIntervalSeconds:设置每隔多长时间,通过一个线程来清理硬盘中的缓存 memoryStoreEvictionPolicy:当超过缓存对象的最大值时,处理的策略;LRU,FIFO,LFU --> <defaultCache maxElementsInMemory="1000" maxElementsOnDisk="1000000" eternal="false" overflowToDisk="false" timeToIdleSeconds="100" timeToLiveSeconds="100" diskExpiryThreadIntervalSeconds="120" memoryStoreEvictionPolicy="LRU"> </defaultCache> </ehcache> ``` **c.在xxxMapper.xml中开启EhCache二级缓存** ```XML <mapper namespace="org.lanqiao.mapper.StudentMapper"> <cache type="org.mybatis.caches.ehcache.EhcacheCache"> <!-- 通过property覆盖Ehcache.xml中的值 --> <property name="maxElementsInMemory" value="2000"/> <property name="maxElementsOnDisk" value="3000"/> </cache> </mapper> ``` --- ## 逆向工程 表、类、接口、mapper.xml四者密切相关,因此 当知道一个的时候 其他三个应该可以自动生成。 一般:表->其他三个 **a.所需依赖** ```XML <dependency> <groupId>org.mybatis</groupId> <artifactId>mybatis</artifactId> <version>3.4.6</version> </dependency> <dependency> <groupId>mysql</groupId> <artifactId>mysql-connector-java</artifactId> <version>8.0.17</version> </dependency> <!-- https://mvnrepository.com/artifact/org.mybatis.generator/mybatis-generator-core --> <dependency> <groupId>org.mybatis.generator</groupId> <artifactId>mybatis-generator-core</artifactId> <version>1.3.5</version> </dependency> ``` **b.配置generator.xml** ```XML <?xml version="1.0" encoding="UTF-8"?> <!DOCTYPE generatorConfiguration PUBLIC "-//mybatis.org//DTD MyBatis Generator Configuration 1.0//EN" "http://mybatis.org/dtd/mybatis-generator-config_1_0.dtd"> <generatorConfiguration> <context id="DB2Tables" targetRuntime="MyBatis3"> <commentGenerator> <!-- suppressAllComments属性值: false:自动生成实体类、SQL映射文件时没有注释 true:自动生成实体类、SQL映射文件,并附有注释 --> <property name="suppressAllComments" value="true"/> </commentGenerator> <!-- 数据库连接信息 --> <jdbcConnection driverClass="com.mysql.cj.jdbc.Driver" connectionURL="jdbc:mysql://localhost:3306/test?useUnicode=true&characterEncoding=utf8&useSSL=false&serverTimezone=Hongkong" userId="root" password="123456"> </jdbcConnection> <!-- forceBigDecimals属性值: true:把数据表中的DECIMAL和NUMERIC类型, 解析为JAVA代码中的java.math.BigDecimal类型 false(默认):把数据表中的DECIMAL和NUMERIC类型, 解析为解析为JAVA代码中的Integer类型 --> <javaTypeResolver> <property name="forceBigDecimals" value="false"/> </javaTypeResolver> <!-- targetProject属性值:实体类的生成位置 targetPackage属性值:实体类所在包的路径 --> <javaModelGenerator targetPackage="cn.ctx.entity" targetProject="./src/main/java"> <!-- trimStrings属性值: true:对数据库的查询结果进行trim操作 false(默认):不进行trim操作 --> <property name="trimStrings" value="true"/> </javaModelGenerator> <!-- targetProject属性值:SQL映射文件的生成位置 targetPackage属性值:SQL映射文件所在包的路径 --> <sqlMapGenerator targetPackage="cn.ctx.mapper" targetProject="./src/main/java"> </sqlMapGenerator> <!-- 生成动态代理的接口 --> <javaClientGenerator type="XMLMAPPER" targetPackage="cn.ctx.mapper" targetProject="./src/main/java"> </javaClientGenerator> <!-- 指定数据库表 --> <table tableName="student"></table> <table tableName="studentcard"></table> </context> </generatorConfiguration> ``` **c.执行main函数** ```Java package cn.ctx; import java.io.File; import java.io.IOException; import java.sql.SQLException; import java.util.ArrayList; import java.util.List; import org.mybatis.generator.api.MyBatisGenerator; import org.mybatis.generator.config.Configuration; import org.mybatis.generator.config.xml.ConfigurationParser; import org.mybatis.generator.exception.InvalidConfigurationException; import org.mybatis.generator.exception.XMLParserException; import org.mybatis.generator.internal.DefaultShellCallback; public class Test { public static void main(String[] args) throws IOException, XMLParserException, InvalidConfigurationException, SQLException, InterruptedException { File file = new File("src/main/resources/generator.xml") ;//配置文件 List<String> warnings = new ArrayList<String>(); ConfigurationParser cp = new ConfigurationParser(warnings); Configuration config = cp.parseConfiguration(file); DefaultShellCallback callBack = new DefaultShellCallback(true); //逆向工程的核心类 MyBatisGenerator generator = new MyBatisGenerator(config, callBack,warnings ); generator.generate(null); } } ``` **d.执行方法** Mybatis的逆向工程有一点特别之处就是会在Entity中生产XxxExample,而一系列的条件限定都是通过这里定义的。 ```java public class TestGeneratorDemo { public static void main(String[] args) throws IOException { String resource = "conf.xml"; Reader reader = Resources.getResourceAsReader(resource); SqlSessionFactory sessionFactory = new SqlSessionFactoryBuilder().build(reader); SqlSession session = sessionFactory.openSession(); StudentMapper mapper = session.getMapper(StudentMapper.class); //规则:example 默认使用的是 第一个criteria StudentExample example = new StudentExample() ; StudentExample.Criteria criteria = example.createCriteria(); criteria.andStunameLike("%l%"); StudentExample.Criteria criteria1 = example.createCriteria(); criteria1.andStunoLessThanOrEqualTo((short)31); criteria1.andGranameLike("%j%") ; example.or(criteria1) ; List<Student> students = mapper.selectByExample(example ) ; System.out.println(students ); session.close(); } } ``` --- ## 下一篇章:Mybatis细节与进阶 <div class="preview"> <div class="post-inser post box-shadow-wrap-normal"> <a href="http://www.tangsong.fun/index.php/Mybatis2.html" target="_blank" class="post_inser_a no-external-link no-underline-link"> <div class="inner-image bg" style="background-image: url(https://blog-picture01.oss-cn-shenzhen.aliyuncs.com/img/20210606201229.JPG);background-size: cover;"></div> <div class="inner-content" > <p class="inser-title">[Mybatis]细节与进阶</p> <div class="inster-summary text-muted"> 进阶版来了!前期回顾看这里:多环境切换当用多个数据库存放不同资源的时候,需要配置多数据源。Mybatis版conf... </div> </div> </a> <!-- .inner-content #####--> </div> <!-- .post-inser ####--> </div> Last modification:August 11, 2022 © Allow specification reprint Like 0 喵ฅฅ