Loading... > **前言**:上篇为了搞懂etcd动态处理数据连接池时候大致分析了一下etcd各模块的作用。近期刚好[哲哥](https://segmentfault.com/u/linzhe_5f715361ed8c9)也在学这块,就在他笔记的基础上出了这篇序章,另部分参考来自[芋艿艿](https://www.iocoder.cn/Spring/ApplicationContextEvent/)、[陈本布衣](https://www.cnblogs.com/chenbenbuyi/p/8166304.html) <!--more--> 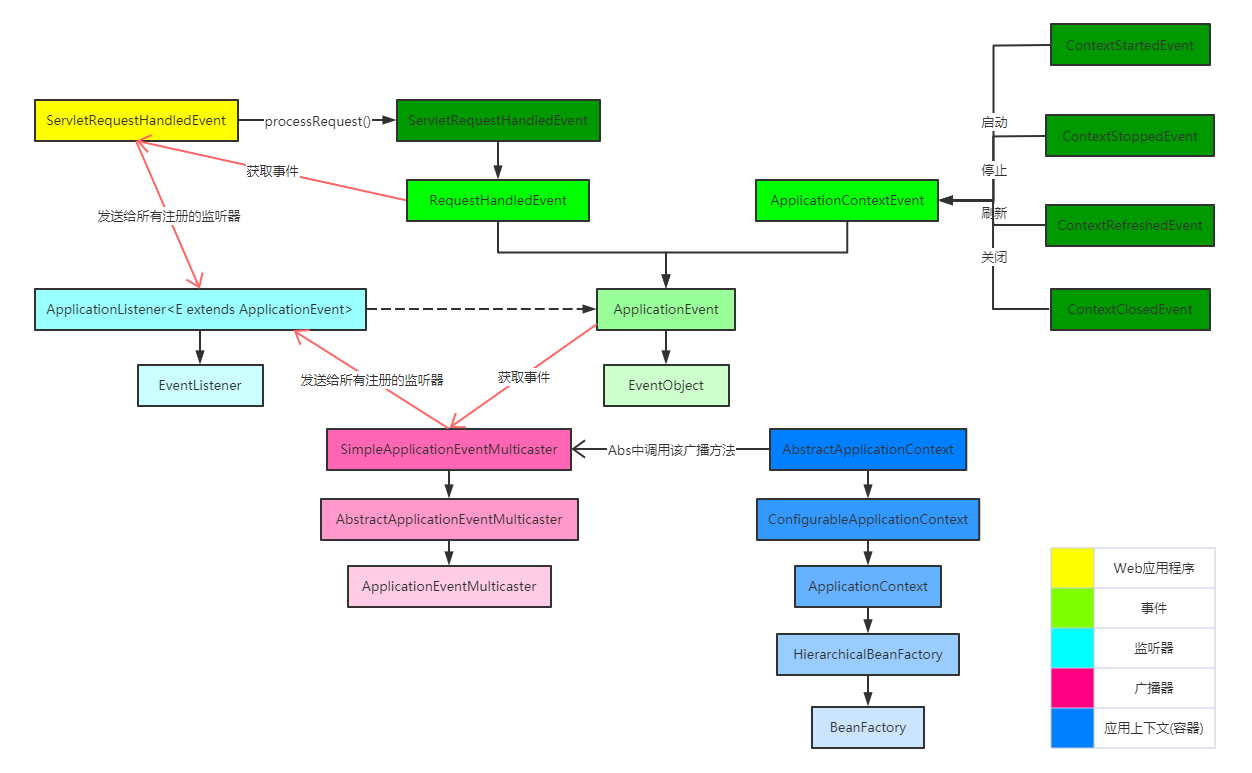 ## 一、简单事件监听器Demo ### Demo1 **(1)定义事件Event:**想要Spring的支持,事件就需要继承 `ApplicationEvent` ```java public class SendMegEvent extends ApplicationEvent { // 附加的信息 private Msg msg; public SendMegEvent(Object source, Msg msg) { super(source); this.msg = msg; } public Msg getMsg() { return msg; } } ``` 事件附带的信息: ```java @Data public class Msg { private String from; private String to; private String context; } ``` **(2)定义监听Listener:**实现SmartApplicationListener接口,重点在 `onApplicationEvent()`方法。 ```java public class MsgListener implements SmartApplicationListener { /** * 支持事件类型 * @param eventType 事件类型 * @return boolean 是否支持该事件类型 */ @Override public boolean supportsEventType(Class<? extends ApplicationEvent> eventType) { // 确定此类对象表示的类或接口是否与指定的类参数表示的类或接口相同,或是其超类或超接口, // 若是返回true return SendMegEvent.class.isAssignableFrom(eventType); } /** * 支持源类型 * @param sourceType 源类型 * @return boolean 是否支持该源类型 */ @Override public boolean supportsSourceType(Class<?> sourceType) { return true; } /** * 对事件的处理 * * @param event 应用程序事件 */ @Override public void onApplicationEvent(ApplicationEvent event) { final SendMegEvent sendMegEvent = (SendMegEvent) event; Msg msg = sendMegEvent.getMsg(); System.out.println("触发事件============="); System.out.println(msg); } } ``` **(3)上下文应用容器ApplicationContext发布事件:**测试类调用发布事件方法 ```java @SpringBootTest public class SentMsgEventTest { @Autowired ApplicationContext applicationContext; @Test public void testSentMsgEvent(){ Msg msg = new Msg(); msg.setContext("impossible"); msg.setFrom("哲"); msg.setTo("女朋友"); // 通过上下文容器发布事件 applicationContext.publishEvent(new SendMegEvent(this,msg)); } } ``` **(4)结果**  ### Demo2 在用户注册完成时,需要给该用户发送邮件、发送优惠劵等等操作。 **(1)controller** ```java @RestController @RequestMapping("/demo") public class DemoController { @Autowired private ListenUserService listenUserService; @GetMapping("/register") public String register(String username) { listenUserService.register(username); return "success"; } } ``` **(2)event** ```java /** * 通过在 UserRegisterEvent 类中,定义成员变量 username,将用户名附带上。 * @author CaiTianXin * @date 2021/03/08 */ public class UserRegisterEvent extends ApplicationEvent { /** * 用户名 */ private String username; public UserRegisterEvent(Object source) { super(source); } public UserRegisterEvent(Object source, String username) { super(source); this.username = username; } public String getUsername() { return username; } } ``` **(3)service** ```java @Service public class ListenUserService implements ApplicationEventPublisherAware { // 实现 ApplicationEventPublisherAware 接口,从而将 ApplicationEventPublisher 注入到其中。 private Logger logger = LoggerFactory.getLogger(getClass()); private ApplicationEventPublisher applicationEventPublisher; @Override public void setApplicationEventPublisher(ApplicationEventPublisher applicationEventPublisher) { this.applicationEventPublisher = applicationEventPublisher; } public void register(String username) { // ... 执行注册逻辑 logger.info("[register][执行用户({}) 的注册逻辑]", username); // 在执行完注册逻辑后,调用 ApplicationEventPublisher 的 publishEvent(ApplicationEvent event) 方法,发布UserRegisterEvent事件 applicationEventPublisher.publishEvent(new UserRegisterEvent(this, username)); } } ``` ```java @Service public class CouponService { private Logger logger = LoggerFactory.getLogger(getClass()); @EventListener // 添加 @EventListener 注解,并设置监听的事件为 UserRegisterEvent。这是另一种使用方式! public void addCoupon(UserRegisterEvent event) { logger.info("[addCoupon][给用户({}) 发放优惠劵]", event.getUsername()); } } ``` ```java @Service public class EmailService implements ApplicationListener<UserRegisterEvent> { // 实现 ApplicationListener 接口,通过 E 泛型设置感兴趣的事件。 private Logger logger = LoggerFactory.getLogger(getClass()); @Override @Async // 设置 @Async 注解,声明异步执行。毕竟实际场景下,发送邮件可能比较慢,又是非关键逻辑。 public void onApplicationEvent(UserRegisterEvent event) { // 实现 onApplicationEvent(E event) 方法,针对监听的 UserRegisterEvent 事件,进行自定义处理。 logger.info("[onApplicationEvent][给用户({}) 发送邮件]", event.getUsername()); } } ``` **(4)结果** 访问接口:`http://localhost:8080/demo/register?username=zhangsan`  --- ## 二、原理分析 ### 事件驱动编程 **`event-driven`**这个概念其实在[《java8实战》](http://www.tangsong.fun/index.php/java8.html)的开头就有提及到了: > “单击鼠标就能给处理程序发送一个事件消息”的思维模型受到广大程序员的喜爱。 通过做一些动作来作为对一些行为的回应,这其实就是事件驱动编程。它是基于对接收信号的反应的编程形式,而这些信号就是**事件**。 ### Spring中的事件与监听 这块其实就是围绕这开头的那张图来分析的,重点绕不开事件、监听器、转发器、上下文应用容器来说明。 但是它们之间又都是彼此联系的,这里只是尽可能的拆分成不同模块来表达清楚一些。 #### (1)事件 一开始的Demo中,自定义事件 `SendMegEvent`就是继承了 `org.springframework.context.ApplicationEvent`。该抽象类继承扩展了 `java.util.EventObject`,可以使用 `EventObject.getSource()`方法,这样我们就可以很容易地获得所发生的给定事件的对象了。 事件分为以下两种类型: **<1>与应用上下文相关联:** 所有这种类型的事件都继承自 `org.springframework.context.event.ApplicationContextEvent`类。 **它们应用于由 `org.springframework.context.ApplicationContext`引发的事件(其构造函数传入的是 `ApplicationContext`类型的参数)。** 这样,我们就可以直接通过应用程序上下文的生命周期来得到所发生的事件: `ContextStartedEvent`在上下文启动时被启动,当它停止时启动 `ContextStoppedEvent`,当上下文被刷新时产生 `ContextRefreshedEvent`,最后在上下文关闭时产生 `ContextClosedEvent`。 **`ApplicationContextEvent`** ```java /** * ApplicationContext引发的事件的基类 */ @SuppressWarnings("serial") public abstract class ApplicationContextEvent extends ApplicationEvent { /** * 创建一个新的ContextStartedEvent。 * param源为该事件引发的ApplicationContext(一定不能为null) */ public ApplicationContextEvent(ApplicationContext source) { super(source); } /** * 获取引发该事件的ApplicationContext。 */ public final ApplicationContext getApplicationContext() { return (ApplicationContext) getSource(); } } ``` **`ContextStartedEvent`**、**`ContextStoppedEvent`**、**`ContextRefreshedEvent`**、**`ContextClosedEvent`** ```java /** * 启动时引发事件 */ @SuppressWarnings("serial") public class ContextStartedEvent extends ApplicationContextEvent { public ContextStartedEvent(ApplicationContext source) { super(source); } } /** * 停止时引发事件 */ @SuppressWarnings("serial") public class ContextStoppedEvent extends ApplicationContextEvent { public ContextStoppedEvent(ApplicationContext source) { super(source); } } /** * 初始化或刷新时引发事件 */ @SuppressWarnings("serial") public class ContextRefreshedEvent extends ApplicationContextEvent { public ContextRefreshedEvent(ApplicationContext source) { super(source); } } /** * 关闭时引发事件 */ @SuppressWarnings("serial") public class ContextClosedEvent extends ApplicationContextEvent { public ContextClosedEvent(ApplicationContext source) { super(source); } } ``` **<2>与request 请求相关联:** 由 `org.springframework.web.context.support.RequestHandledEvent`实例来表示,当在 `ApplicationContext`中处理请求时,它们被引发。其父类为 `ServletRequestHandledEvent`。 ```java /** * 在ApplicationContext中处理请求时引发的事件。 * 由Spring自己的FrameworkServlet支持(通过特定的ServletRequestHandledEvent子类),但也可以由其他任何Web组件引发。 */ @SuppressWarnings("serial") public class RequestHandledEvent extends ApplicationEvent { /** Session id that applied to the request, if any. */ @Nullable private String sessionId; /** Usually the UserPrincipal. */ @Nullable private String userName; /** Request processing time. */ private final long processingTimeMillis; /** Cause of failure, if any. */ @Nullable private Throwable failureCause; /** * Create a new RequestHandledEvent with session information. * @param source the component that published the event * @param sessionId the id of the HTTP session, if any * @param userName the name of the user that was associated with the * request, if any (usually the UserPrincipal) * @param processingTimeMillis the processing time of the request in milliseconds */ public RequestHandledEvent(Object source, @Nullable String sessionId, @Nullable String userName, long processingTimeMillis) { super(source); this.sessionId = sessionId; this.userName = userName; this.processingTimeMillis = processingTimeMillis; } /** * Create a new RequestHandledEvent with session information. * @param source the component that published the event * @param sessionId the id of the HTTP session, if any * @param userName the name of the user that was associated with the * request, if any (usually the UserPrincipal) * @param processingTimeMillis the processing time of the request in milliseconds * @param failureCause the cause of failure, if any */ public RequestHandledEvent(Object source, @Nullable String sessionId, @Nullable String userName, long processingTimeMillis, @Nullable Throwable failureCause) { this(source, sessionId, userName, processingTimeMillis); this.failureCause = failureCause; } /** * Return the processing time of the request in milliseconds. */ public long getProcessingTimeMillis() { return this.processingTimeMillis; } /** * Return the id of the HTTP session, if any. */ @Nullable public String getSessionId() { return this.sessionId; } /** * Return the name of the user that was associated with the request * (usually the UserPrincipal). * @see javax.servlet.http.HttpServletRequest#getUserPrincipal() */ @Nullable public String getUserName() { return this.userName; } /** * Return whether the request failed. */ public boolean wasFailure() { return (this.failureCause != null); } /** * Return the cause of failure, if any. */ @Nullable public Throwable getFailureCause() { return this.failureCause; } /** * Return a short description of this event, only involving * the most important context data. */ public String getShortDescription() { StringBuilder sb = new StringBuilder(); sb.append("session=[").append(this.sessionId).append("]; "); sb.append("user=[").append(this.userName).append("]; "); return sb.toString(); } /** * Return a full description of this event, involving * all available context data. */ public String getDescription() { StringBuilder sb = new StringBuilder(); sb.append("session=[").append(this.sessionId).append("]; "); sb.append("user=[").append(this.userName).append("]; "); sb.append("time=[").append(this.processingTimeMillis).append("ms]; "); sb.append("status=["); if (!wasFailure()) { sb.append("OK"); } else { sb.append("failed: ").append(this.failureCause); } sb.append(']'); return sb.toString(); } @Override public String toString() { return ("RequestHandledEvent: " + getDescription()); } } ``` #### (2)广播器 那么Spring又是如何将事件分配给专门的监听器(注意不是所有监听器)呢? 这个过程由事件广播器(`event multicaster`)来实现,由 `org.springframework.context.event.ApplicationEventMulticaster`接口的实现表示。它定义了三种类型的方法: * 添加新的监听器:`addApplicationListener(ApplicationListener<?> listener)`和 `addApplicationListenerBean(String listenerBeanName)`。 当监听器对象已知时,可以应用第一个。如果使用第二个,我们需要将bean name得到listener对象(依赖查找DL),然后再将其添加到listener列表中。 * 删除监听器:前两种同上, 第三种方法 `removeAllListeners()`用来删除所有已注册的监听器。 * 将事件发送到已注册的监听器:由multicastEvent(ApplicationEvent event),**将给定的事件广播到支持的监听器**。 我们先回头看下Demo中 `publishEvent()`方法(ApplicationContext后面再谈),最终走的是 `ApplicationContext->ApplicationEventPublisher->AbstractApplicationContext.publishEvent()`方法下的 `getApplicationEventMulticaster().multicastEvent(applicationEvent, eventType)` (还记得上文提到的四种启动停止刷新关闭事件吗,它们触发的就是该 `publishEvent()`方法) 也就是说实际调用的是 `ApplicationEventMulticaster`接口的实现类 `SimpleApplicationEventMulticaster`中的 `multicastEvent()`实现方法。 **`SimpleApplicationEventMulticaster`** ```java @Override public void multicastEvent(final ApplicationEvent event, @Nullable ResolvableType eventType) { ResolvableType type = (eventType != null ? eventType : resolveDefaultEventType(event)); // 获取executor Executor executor = getTaskExecutor(); // 遍历,筛选获取支持该事件的listener for (ApplicationListener<?> listener : getApplicationListeners(event, type)) { // executor不为null,由executor多线程执行invokeListener if (executor != null) { executor.execute(() -> invokeListener(listener, event)); } // 为null转下一个方法分析 else { invokeListener(listener, event); } } } /** * 用给定的事件调用给定的侦听器 */ protected void invokeListener(ApplicationListener<?> listener, ApplicationEvent event) { ErrorHandler errorHandler = getErrorHandler(); if (errorHandler != null) { try { doInvokeListener(listener, event); } catch (Throwable err) { errorHandler.handleError(err); } } else { // 直接看这里,转下一个方法分析 doInvokeListener(listener, event); } } @SuppressWarnings({"rawtypes", "unchecked"}) private void doInvokeListener(ApplicationListener listener, ApplicationEvent event) { try { // 调用ApplicationListener的onApplicationEvent()方法 listener.onApplicationEvent(event); } catch (ClassCastException ex) { ... } } ``` 再来看看筛选方法: **`AbstractApplicationEventMulticaster`** ```java /** * 返回与给定事件类型匹配的ApplicationListeners的集合。不匹配的监听器会被排除在外。 */ protected Collection<ApplicationListener<?>> getApplicationListeners( ApplicationEvent event, ResolvableType eventType) { ... // 快速检查ConcurrentHashMap上的现有条目 ListenerRetriever retriever = this.retrieverCache.get(cacheKey); if (retriever != null) { // 获取Listener(走缓存) return retriever.getApplicationListeners(); } if (this.beanClassLoader == null || (ClassUtils.isCacheSafe(event.getClass(), this.beanClassLoader) && (sourceType == null || ClassUtils.isCacheSafe(sourceType, this.beanClassLoader)))) { ... } } else { // 同样获取Listener(没走缓存) // 无需ListenerRetriever缓存->无需同步 return retrieveApplicationListeners(eventType, sourceType, null); } } /** * AbstractApplicationEventMulticaster下的私有内部类ListenerRetriever * 获取Listener */ public Collection<ApplicationListener<?>> getApplicationListeners() { // 开辟合适大小,获取所有监听器 List<ApplicationListener<?>> allListeners = new ArrayList<>( this.applicationListeners.size() + this.applicationListenerBeans.size()); allListeners.addAll(this.applicationListeners); if (!this.applicationListenerBeans.isEmpty()) { BeanFactory beanFactory = getBeanFactory(); // 遍历监听器名称 for (String listenerBeanName : this.applicationListenerBeans) { try { // 根据监听器名称,从容器中获取相应的bean ApplicationListener<?> listener = beanFactory.getBean(listenerBeanName, ApplicationListener.class); // 若该bean不在allListeners中,则添加 if (this.preFiltered || !allListeners.contains(listener)) { allListeners.add(listener); } } catch (NoSuchBeanDefinitionException ex) { ... } } } // 按order接口排序 if (!this.preFiltered || !this.applicationListenerBeans.isEmpty()) { AnnotationAwareOrderComparator.sort(allListeners); } return allListeners; } /** * 根据事件和类型检索实际对应的监听器 */ private Collection<ApplicationListener<?>> retrieveApplicationListeners( ResolvableType eventType, @Nullable Class<?> sourceType, @Nullable ListenerRetriever retriever) { ... // 添加listener到retriever中 // 添加以编程方式注册的监听器,包括即将到来的(这句没懂) // 来自ApplicationListener Detector(单个bean和内部bean)。 for (ApplicationListener<?> listener : listeners) { if (supportsEvent(listener, eventType, sourceType)) { if (retriever != null) { retriever.applicationListeners.add(listener); } allListeners.add(listener); } } // 按bean名称添加监听器,可能会与之重叠 if (!listenerBeans.isEmpty()) { ConfigurableBeanFactory beanFactory = getBeanFactory(); for (String listenerBeanName : listenerBeans) { try { // 依据allListeners以及监听和对应的类型是否匹配来添加 if (supportsEvent(beanFactory, listenerBeanName, eventType)) { ApplicationListener<?> listener = beanFactory.getBean(listenerBeanName, ApplicationListener.class); // supportsEvent()中确定给定的监听器是否支持给定的事件,具体是在GenericApplicationListener类中做判断的 if (!allListeners.contains(listener) && supportsEvent(listener, eventType, sourceType)) { if (retriever != null) { if (beanFactory.isSingleton(listenerBeanName)) { retriever.applicationListeners.add(listener); } else { retriever.applicationListenerBeans.add(listenerBeanName); } } allListeners.add(listener); } } else { // 移除不匹配的监听器 Object listener = beanFactory.getSingleton(listenerBeanName); if (retriever != null) { retriever.applicationListeners.remove(listener); } allListeners.remove(listener); } } catch (NoSuchBeanDefinitionException ex) { ... } } } AnnotationAwareOrderComparator.sort(allListeners); if (retriever != null && retriever.applicationListenerBeans.isEmpty()) { retriever.applicationListeners.clear(); retriever.applicationListeners.addAll(allListeners); } // 返回过滤后的监听器集合 return allListeners; } ``` **小结:** 在广播器中,如果存在符合该事件的监听器,就发送给它;否则,就通过ApplicationListener初始化一个。 筛选的方法有缓存和非缓存两种情况,都在 `AbstractApplicationEventMulticaster`类中。 而,广播器的注册,则是在AbstractApplicationContex中,暂且留到应用上下文的时候在分析。 #### (3)监听器 Spring基于实现 `org.springframework.context.ApplicationListener`接口的bean来进行事件处理。这个接口中的 `onApplicationEvent()`方法是**对事件发送过来后触发相应的处理**。该接口可以通过指定需要接收的事件来实现。 (上文提到广播器中就已经筛选完合适的事件给对应的监听器,所以这边拿到的已经是符合的事件了) **`ApplicationListener`** ```java /** * 从Spring 3.0开始,ApplicationListener 可以通用地声明感兴趣的事件类型。 * 在Spring ApplicationContext中注册时,将相应地过滤事件,并且监听器仅在匹配事件对象上被调用。 */ @FunctionalInterface public interface ApplicationListener<E extends ApplicationEvent> extends EventListener { /** * 事件处理 */ void onApplicationEvent(E event); } ``` 而一般自定义的监听器大多都是继承 `SmartApplicationListener`。 它是 `ApplicationListener`接口的标准扩展体,公开了它的元数据,如:支持事件和元数据类型。 **`SmartApplicationListener`** ```java public interface SmartApplicationListener extends ApplicationListener<ApplicationEvent>, Ordered { /** * 确定此监听器是否实际上支持给定的事件类型。 */ boolean supportsEventType(Class<? extends ApplicationEvent> eventType); /** * 确定此监听器是否实际上支持给定的源类型。 默认为 true */ default boolean supportsSourceType(@Nullable Class<?> sourceType) { return true; } /** * 同一事件符合条件的监听器集合排序规则 */ @Override default int getOrder() { return LOWEST_PRECEDENCE; } } ``` 监听器的重点还是放在 `onApplicationEvent()`也就是对触发事件的处理上。 #### (4)应用上下文(容器) **容器是Spring框架实现功能的核心**,最耳熟能详的就是**IOC容器**,而容器并不唯一,框架本身就提供了很多个容器的实现。 这里插播一段大白话加深一下理解: 对象是用new生产的,而专门搞生产的地方不叫工厂,叫**容器**。Tomcat就是属于Web容器。容器不只是帮我们创建了对象那么简单,它负责了对象整个的生命周期的管理:**创建**、**装配**、**销毁**。 我们把对象创建、管理的控制权都交给Spring容器,这是一种控制权的反转(**控制反转**),所以Spring容器才能称为IOC容器。 而实际上,容器只是给我们提供一个管理对象的空间而已,它里面什么都没有的。我们如果要向容器中放入我们需要容器代为管理的对象,就要用到**应用上下文**。可以简单粗暴的理解为,**应用上下文就是将需要Spring帮忙管理的对象放入容器的那么一种容器对象(或者叫环境)**。 容器大概分为两种类型: 一种是不常直接用的BeanFactory,这是最简单的容器,只能提供基本的DI功能; 还有一种就是继承了BeanFactory后派生而来的**应用上下文**,其抽象接口也就是Demo测试类中提到的 `ApplicationContext`,它能提供更多企业级的服务,例如解析配置文本信息等等,这也是应用上下文实例对象最常见的应用场景。而有了上下文对象,我们就能向容器注册需要Spring管理的对象了。 有了上述的解释这个抽象的词就很好理解了,它相当于容器中有控制权的真正“代理者”。所以注册广播器、注册监听器或者是调用广播器的推送这些都是在这个“容器”环境下进行的。 **`AbstractApplicationContext`** ```java @Override public void refresh() throws BeansException, IllegalStateException { synchronized (this.startupShutdownMonitor) { // 准备工作:设置启动时间、是否激活标识位、初始化属性源(property source)配置 prepareRefresh(); // 用子类refreshBeanFactory()方法,获取bean factory ConfigurableListableBeanFactory beanFactory = obtainFreshBeanFactory(); // 创建bean Factory的通用设置,添加ApplicationContextAwareProcessor // ResourceLoader、ApplicationEventPublisher、ApplicationContext这3个接口对应的bean都设置为当前的Spring容器,注册环境bean prepareBeanFactory(beanFactory); try { // 子类特殊的bean factory设置 // GenericWebApplicationContext容器会在BeanFactory中添加ServletContextAwareProcessor用于处理ServletContextAware类型的bean初始化的时候调用setServletContext或者setServletConfig方法 postProcessBeanFactory(beanFactory); // 实例化beanFactoryPostProcessor // 调用beanFactoryPostProcessor 这里会调用ConfigurationClassPostProcessor,解析@Configuration的类为BeanDefinition,为后面实例化作准备 invokeBeanFactoryPostProcessors(beanFactory); // 实例化并注册所有BeanPostProcessor Bean(包括自定义的),在实例化bean后处理 // 将Spring自带的监听器先放到BeanFactory中(因为此时广播器还未注册) registerBeanPostProcessors(beanFactory); // 初始化信息源,和国际化相关 initMessageSource(); // 注册广播器 initApplicationEventMulticaster(); // 调用子类特殊的刷新逻辑 onRefresh(); // 注册监听器 registerListeners(); // 实例化所有非懒加载单例 finishBeanFactoryInitialization(beanFactory); // 初始化容器的生命周期事件处理器,并发布容器的生命周期事件 finishRefresh(); } catch (BeansException ex) { ... } finally { ... } } } ``` **注册广播器:** ```java /** * 初始化ApplicationEventMulticaster。 * 如果上下文中未定义,则使用SimpleApplicationEventMulticaster */ protected void initApplicationEventMulticaster() { ConfigurableListableBeanFactory beanFactory = getBeanFactory(); // APPLICATION_EVENT_MULTICASTER_BEAN_NAME = "applicationEventMulticaster" // 如果存在名为applicationEventMulticaster的bean就将其赋值为context的applicationEventMulticaster if (beanFactory.containsLocalBean(APPLICATION_EVENT_MULTICASTER_BEAN_NAME)) { this.applicationEventMulticaster = beanFactory.getBean(APPLICATION_EVENT_MULTICASTER_BEAN_NAME, ApplicationEventMulticaster.class); if (logger.isTraceEnabled()) { logger.trace("Using ApplicationEventMulticaster [" + this.applicationEventMulticaster + "]"); } } else { // 没有,就new一个SimpleApplicationEventMulticaster,并将其设置为单例 this.applicationEventMulticaster = new SimpleApplicationEventMulticaster(beanFactory); beanFactory.registerSingleton(APPLICATION_EVENT_MULTICASTER_BEAN_NAME, this.applicationEventMulticaster); if (logger.isTraceEnabled()) { logger.trace("No '" + APPLICATION_EVENT_MULTICASTER_BEAN_NAME + "' bean, using " + "[" + this.applicationEventMulticaster.getClass().getSimpleName() + "]"); } } } ``` 补充说明: 在SpringBoot启动过程中,SpringApplicationRunListener会监听到其中发生contextPrepared事件的时候,会通过EventPublishingRunListener把事件广播器注入到BeanFactory中。 所以initApplicationEventMulticaster不再需要再次注册,只需要拿出BeanFactory中的事件广播器然后设置到Spring容器的属性中即可。如果没有使用SpringBoot的话,Spring容器得需要自己初始化事件广播器。 **注册监听器:** 1.先将Spring容器自带的监听器注册到BeanFactory中(此时广播器还未注册) ```java final class PostProcessorRegistrationDelegate { ... // 注册ApplicationListenerDetector 放到最后 protected void registerBeanPostProcessors(ConfigurableListableBeanFactory beanFactory) { PostProcessorRegistrationDelegate.registerBeanPostProcessors(beanFactory, this); } } ``` **`ApplicationListenerDetector`** ```java @Override public void postProcessMergedBeanDefinition(RootBeanDefinition beanDefinition, Class<?> beanType, String beanName) { // 判断是否是单列,将结果与beanName存入singletonNames这个map if (ApplicationListener.class.isAssignableFrom(beanType)) { this.singletonNames.put(beanName, beanDefinition.isSingleton()); } } @Override public Object postProcessAfterInitialization(Object bean, String beanName) { if (bean instanceof ApplicationListener) { // 是否为ApplicationListener类 Boolean flag = this.singletonNames.get(beanName); if (Boolean.TRUE.equals(flag)) { // 如果是单例bean,像容器中注册listener this.applicationContext.addApplicationListener((ApplicationListener<?>) bean); } else if (Boolean.FALSE.equals(flag)) { if (logger.isWarnEnabled() && !this.applicationContext.containsBean(beanName)) { // 具有其他作用域的内部Bean-无法可靠地处理事件 logger.warn("Inner bean '" + beanName + "' implements ApplicationListener interface " + "but is not reachable for event multicasting by its containing ApplicationContext " + "because it does not have singleton scope. Only top-level listener beans are allowed " + "to be of non-singleton scope."); } // 从singletonNames中移除非单例的 this.singletonNames.remove(beanName); } } return bean; } ``` 2.把Spring容器内的监听器和BeanFactory中的监听器都添加到广播器中。 ```java /** * 将实现了ApplicationListener的Bean作为监听器添加 * 不会影响其他监听器,可以不添加bean而添加其他监听器。 */ protected void registerListeners() { // 将ApplicationListenerDetector中往context添加的listener bean往广播器注册。 for (ApplicationListener<?> listener : getApplicationListeners()) { getApplicationEventMulticaster().addApplicationListener(listener); } // 不要在这里初始化FactoryBeans:我们需要保留所有未初始化的常规bean,以便后处理器对其应用! // 根据类型 获取bean的名称 String[] listenerBeanNames = getBeanNamesForType(ApplicationListener.class, true, false); // 往广播器中添加 for (String listenerBeanName : listenerBeanNames) { getApplicationEventMulticaster().addApplicationListenerBean(listenerBeanName); } // 现在广播器和监听器都注册完成了,可以开始发布之前堆积的事件了。 Set<ApplicationEvent> earlyEventsToProcess = this.earlyApplicationEvents; this.earlyApplicationEvents = null; if (!CollectionUtils.isEmpty(earlyEventsToProcess)) { for (ApplicationEvent earlyEvent : earlyEventsToProcess) { getApplicationEventMulticaster().multicastEvent(earlyEvent); } } } ``` Last modification:August 21, 2022 © Allow specification reprint Like 0 喵ฅฅ
One comment